|
DocumentationIt is best to install the .NET 4.0 Full Framework, which is available for Windows XP SP3 (SP2 works with limitations) up to 7. IntroductionBefore starting the converter tool you make sure that Delphi 2007 (or higher) and Visual Studio 2010 are installed properly.
The installation process has placed a sample project on your drive, namely in Documents\Hybrie.NET
The project consists of a Delphi and a C# program.
We will now use the converter to create the components which makes it possible for both programs to communicate with each other.
Just start the converter and it will show up with all needed data already predefined to make the first step as simple as possible.
You only have to press "Start Converter" button.
After the conversion process finishes you can click on Show Generated Output button, and then compile both the Delphi and C# project: - For C# there is a batch script to compile the C# files in the CSharp subfolder
- For Delphi, you have to open the Hybrie.grouprj in the Delphi subfolder
Note: The Delphi project requires a component to be installed. You will find the Demo_Hybrie_FormPackage project in the project group.
Just do as usual and press right click to install.
This package was created by the converter and contains the needed component. After having done so you can take a look onto the component.
It contains for each variable a suitable method which can be used to build a connection to the C# portion of the whole project.
The methods are already connected to Delphi code in this sample.
Compile the Delphi project and after that the C# project. For C# start the compile.cmd batch file.
Now start the C# demo and then the Delphi demo. Try to change the data in the Delphi form and watch how the data changes in the C# program. Quick startHow to - Create a new project
Use case: You have an existing Delphi Project which you want to make accessible in .NET
Press New Choose a project (where to place the definition files). This could be a sub folder named Definition in your C# project folder. Here you will create a file "Your.Fully.Qualified.IInterface.yml", where "Your.Fully.Qualified" is the namespace you will be using to access the interface (both in .NET and in Delphi)
and "IInterface" is the name of the interface you will be describing. Interface Specification Choose an "Generate Folder" (conveniently this should be just your C# project folder, a sub directory named CSharp will be automatically generated If you specified your file then press Save and Start Convert Now there should be two subfolders in your "Generate Folder",
one named Delphi containing 2 Delphi projects for inclusion in your existing project and one named CSharp,
this contains files you can include in your C# project. There will be two components in your Component Toolbox in Visual Studio. To make the Delphi code work, you have to include the two projects into your Group-Project, and install them both. In your main form, please add the following procedure to your file:
procedure WMCopyData(var Msg : TWMCopyData); message WM_COPYDATA;
With the simple definition:
procedure TMainForm.WMCopyData(var Msg: TWMCopyData);
begin
  TSFInteropIPC.Singleton.WMCopyData(Msg);
end;
Where TMainForm is your form class name. - Modifying an interface
Types follow closely the .NET CTS (Common Type System), except Generics, which are not yet fully supported.
Open the "Your.Fully.Qualified.IInterface.yml" in your preferred editor (e.g. Notepad++) Add a define-method: section Specify guid: (use the visual studio Guidgen.exe) or use AutoHotKey to provide a Guid for you Specify in parameters in a list (name - type pair) Specify a return type: -return: type Specify a name: Note: As C# is supported, the names are case sensitive! Main FormHaving finished the installation, a shortcut is provided in your start menu and on your desktop (Hybrie.NET). The main startup screen appears as follows (Windows 7): 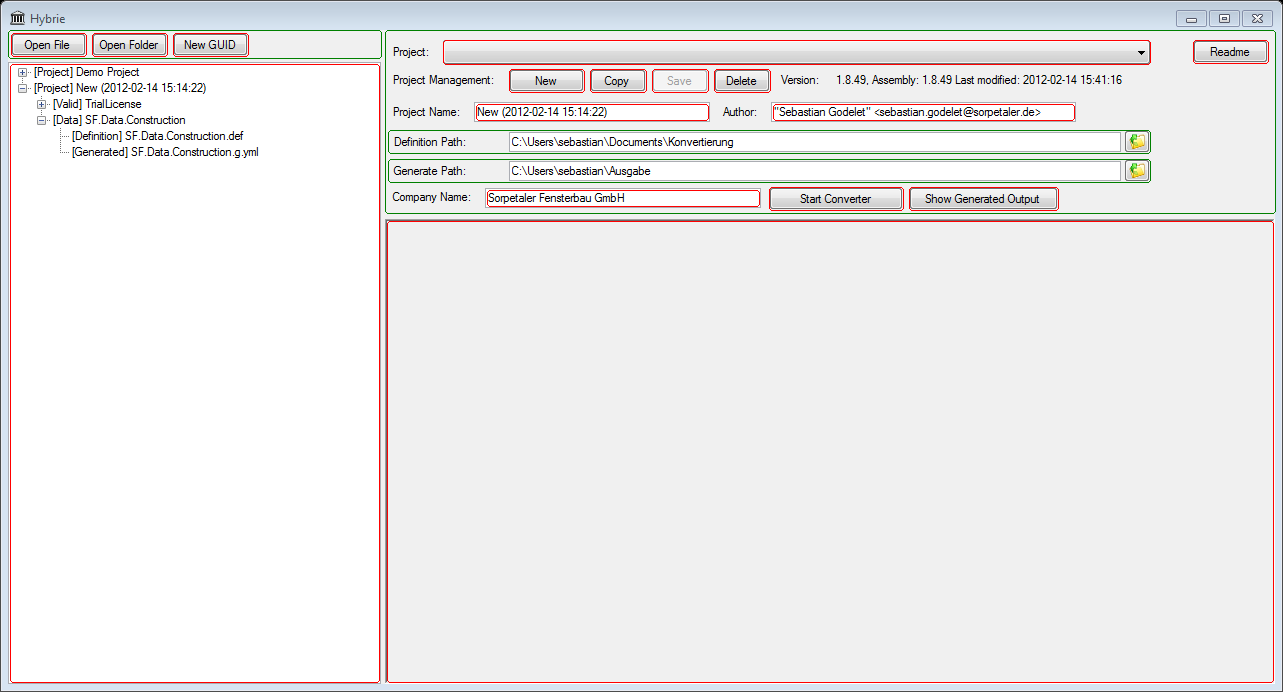
- Project Tree Navigation
This panel allows you to perform operations on the current selected node in the tree below. This can also be reached by using the context menu of a node.
- Open File
Opens the currently selected file in an editor (Windows file association)
- Open Folder
Opens the corresponding folder of the selected node
- Generate New GUID
Generates a new GUID (alpha-numeric format) and copies it to the clipboard.
- Hybrie
The main application form. All Operations can be started from here.
There are the following important file types used in the converting and generating process.
- Delphi Import File [detailed version]
These files can import data type definitions from delphi.They are run by the frontend
which analyzes the files specified within and generates a corresponding User Type Definition - Interface Specification [detailed version]
For defining remote callable modules in your programs, you need an interface specification
For now, these need to be manually edited, but do not fear, it closely follows the YAML specification
Here you can define methods and their parameters, using .NET primitive types, arrays and User Type Definition - User Type Definition [detailed version]
The data type specification is the core of the interoperability between different computer languages.
- Project Tree
All the files that are found in the definition directory are displayed here.
- Logging Window
All exceptions and messages related to transforming are displayed here.
- Project Settings
In this panel, you can adjust all project related settings, and initiate the conversion process. By adjusting the currently selected project, all data in the input fields gets overwritten, so be aware.
- Current Selected Project
Here you can select the current project from all projects stored on this computer.
- Readme
Opens the readme.rtf file which is contained in the installation directory.
- New
This creates a new blank project
- Copy
Copy all the current settings into a new project (suffix - Copy)
- Save
Save all the project settings
- Delete
Delete the current project (does not delete files on disk)
- Project Name
The (unique) name of your project
- Author
The author of the program
- Definition path
In this folder, all definitions are kept, plus the license file (license.xml).
As you may have noticed in the demo project, there are two files, one is called Hybrie.Demo.IForm and one is Hybrie.Demo.Data
- Generate Path
All generated output is saved here, so it is important that this folder has read-write-access
Each Language Supported so far C# and Delphi, will have their own subfolder, as you might see in the demo project
Please take a look at the Project Tree on the left and right click on the file, right click on the file:
- Open in Notepad
- Open folder
- Company Name
The name of the company that will be displayed in the generated source files
- Start Converter
This button starts the conversion process
- Show Generated Output
Opens the folder where all output is written to.
|
 |
| |